MHI2MQTT
Arduino-based communication interface for Mitsubishi Heavy Industries (MHI) SRK/SRF series air conditioners. It will likely work for more models but I am not able to test this. Connects to the MHI CNS connector and synchronizes to its Serial Peripheral Interface (SPI). Updates from the MHI are sent via serial to an ESP8266 running an MQTT client. Updates received on the ESP8266 via MQTT are sent to the Arduino over serial and injected into the SPI data frames to update the MHI.
Getting started
The provided code is not a library, but is rather intended as a ready-to-use firmware solution for wirelessly controlling the aircon via MQTT using an Arduino Pro Mini/ESP8266 combination.
Circuit and connector
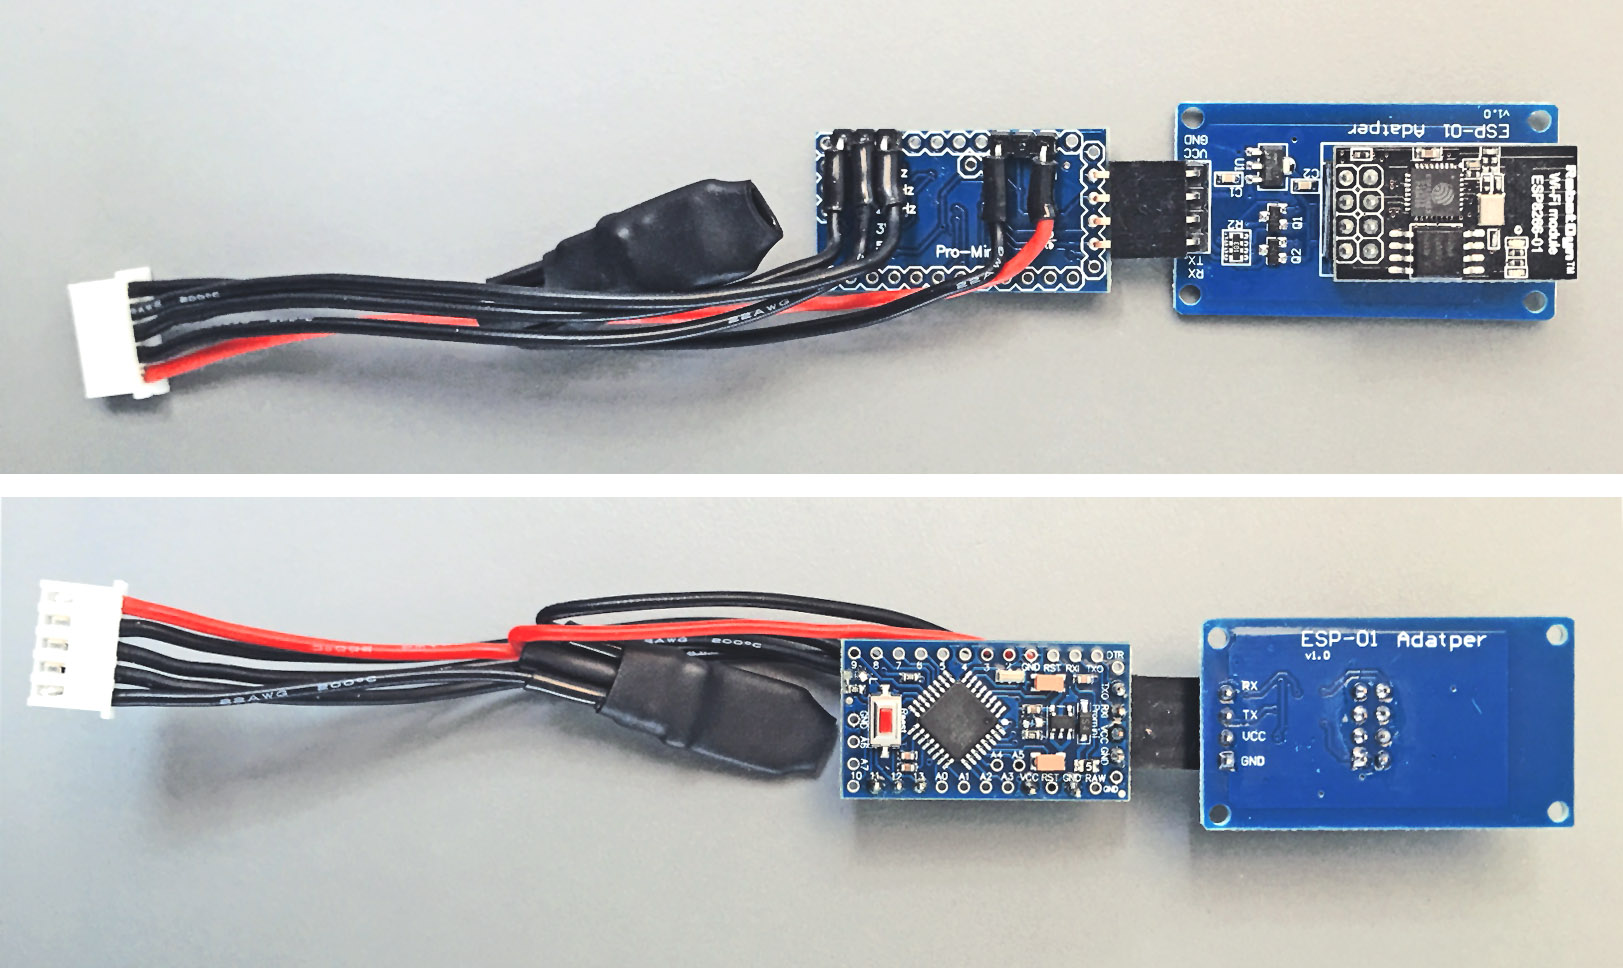
I would like to advise you to not solder a fixed connection between the Arduino and ESP-01. Using male and female pin headers for the connection (see figure above) will enable you to easily upload updates the Arduino at a later stage.
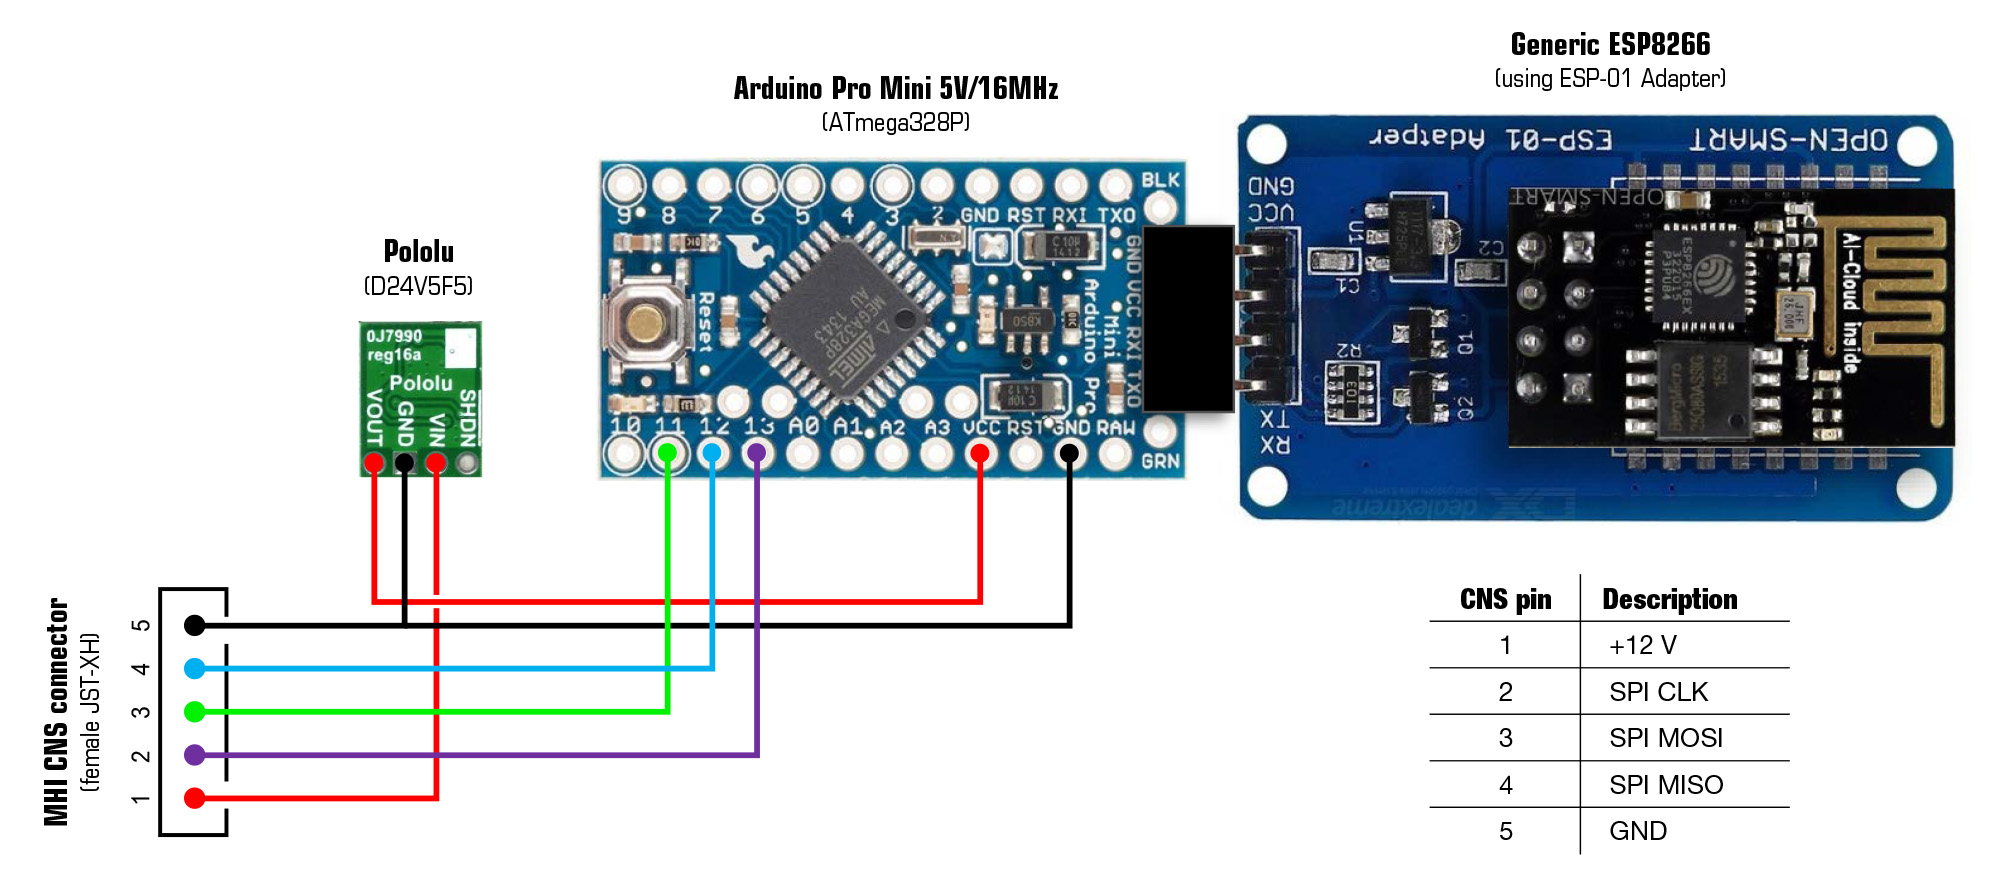
The CNS socket on the MHI indoor unit’s PCB accepts a JST-XH 5-pin female connector. It can be bought pre-wired as a 4S LiPo balance cable. In addition, I use a prefab male-to-female version of this cable as an extension cord.
JST-XH pin layout (looking at the male socket on the PCB with the locking protrusions/slots downwards):
Pin 1 (left) = 12V, pin 2 = SPI clock, pin 3 = SPI MOSI, pin 4 = SPI MISO, pin 5 (right) = GND.
Check before connecting with a multitester. GND versus clock should be +5V. If the voltage over outer pins is -12V then connector orientation is wrong. Pins 2 - 5 are 5V and directly compatible with an Arduino Pro Mini 5V/16 MHz version. Note that the 3.3V/8MHz version is NOT directly compatible and logic level conversion is necessary. The 8 MHz is possibly to slow to keep up with SPI communication and data processing, although I didn’t test this.
The Arduino Pro Mini is 12V tolerant according to its specs, but using the 12V (pin 1) of the MHI unit did not work in my setup. I use a Pololu D24V5F5 step-down voltage regulator to power both the Pro Mini and the ESP8266.
Oh, and while you’re at it, take out the two LEDs on the Arduino. They are ridiculously bright. Really, the light will pass through the plastic casing and will light up your aircon like it’s Christmas all year. It’s better to use a soldering iron to do this (find good instructions on YouTube). Do not start cutting the LEDs traces as you will likely damage traces underneath.
After soldering and uploading the firmware, I wrapped the entire contraption in shrink wrap to fix all the (re)movable parts and protect against causing possible short-circuits while installed in the aircon.
Parts
- Arduino Pro Mini 5V/16MHz
- ESP-01 ESP8266 WiFi Module
- ESP-01 Adapter
- Pololu 5V, 500mA Step-Down Voltage Regulator D24V5F5
- 4S LiPo Battery Balance Charger Plug JST-XH
Installation
Dependencies
The following additional libraries are necessary and should be added to the Arduino IDE before compiling and flashing the sketches:
- WiFiManager - For managing the WiFi connection and changing MQTT settings
- PubSubClient - MQTT client
- EasyTransfer - Takes care of serial communication between the Pro Mini and ESP-01
- ArduinoJson - JSON library for reading and storing WiFiManager settings in flash memory
Installing the sketches
Two sketches are provided:
-
Arduino Pro Mini
Upload MHI-SPI2ESP.ino using the Arduino IDE and an FTDI USB-serial adapter.
In the Arduino IDE, select Arduino Pro or Pro mini under Tools > Board and select ATmega328P (5V, 16 MHz) under Tools > Processor. -
ESP-01 ESP8266 WiFi module
Optional: Change the name (SSID) and password of the access point that is started by the ESP-01 for configuration on first boot (lines 21-22 of MHI-ESP2MQTT.ino). This is not the name of your home WiFi network (SSID)! I use the name of the room the air conditioner is in.
Upload MHI-ESP2MQTT.ino using the Arduino IDE and an ESP-01 ESP8266 USB-UART Adapter.
In the Arduino IDE, select Generic ESP8266 Module under Tools > Board. I have used the following settings (running at 160 MHz is probably not necessary):

Once the sketch is flashed for the first time, future updates to the ESP-01 can also be uploaded OTA. Name and password are equal to those set for the configuration access point (Default: MHI Roomname with password mitsubishi). The Arduino Pro Mini cannot be updated OTA.
Connecting and configuring the system
- Disconnect the mains
- Connect the circuit to the air conditioner’s CNS connector*
- Reconnect the mains
- Using a tablet or smart phone, connect to the ESP-01’s SSID (default: MHI Roomname, or as configured in line 21 of MHI-ESP2MQTT.ino)
- Default password is mitsubishi, or as configured in line 22 of MHI-ESP2MQTT.ino
- The configuration portal should display automatically within a few seconds. If not, open a browser and enter 192.168.4.1.
- Select Configure WiFi
- Select the home network on which the MQTT broker is running
- Enter the WiFi password
- Enter the IP address and port number of the MQTT broker
- Enter the MQTT username and password (leave empty if not used)
- Optional: Change the WiFi Timeout (max. 99 minutes; default: 5 minutes). Don’t set it too high or it will take a long time before it will reconnect after the network has been down.
- Set the name of the room that the aircon is in (all available MQTT topics will have the prefix Roomname/Aircon/…). You can add deeper topic levels in the Roomname field (e.g. Bedroom/John).
- Optional: Change the name of the unit (default: Aircon)
- Optional: Change topic names for setpoint, state, vanes, fan speed, debug and service
- Topic names that start with status by default, will be updated with the current aircon settings every ~6 seconds, or directly after a new setting is acknowledged by the aircon
- Select Save
The system will connect to the selected WiFi network and the MQTT broker. You can quickly check if everything works by using the command line to temporarily subscribe to the relevant topics: Roomname/Aircon/#. If all is well, a successful connection will be notified on the debug topic. Within ~10 seconds after connection, the aircon’s current settings will be sent to the status topics. From now on, sending payloads to the topics (see table below under Wireless operation using MQTT) should cause the aircon to respond within max. 2 seconds. All successful commands will be acknowledged by the aircon on the respective status topic.
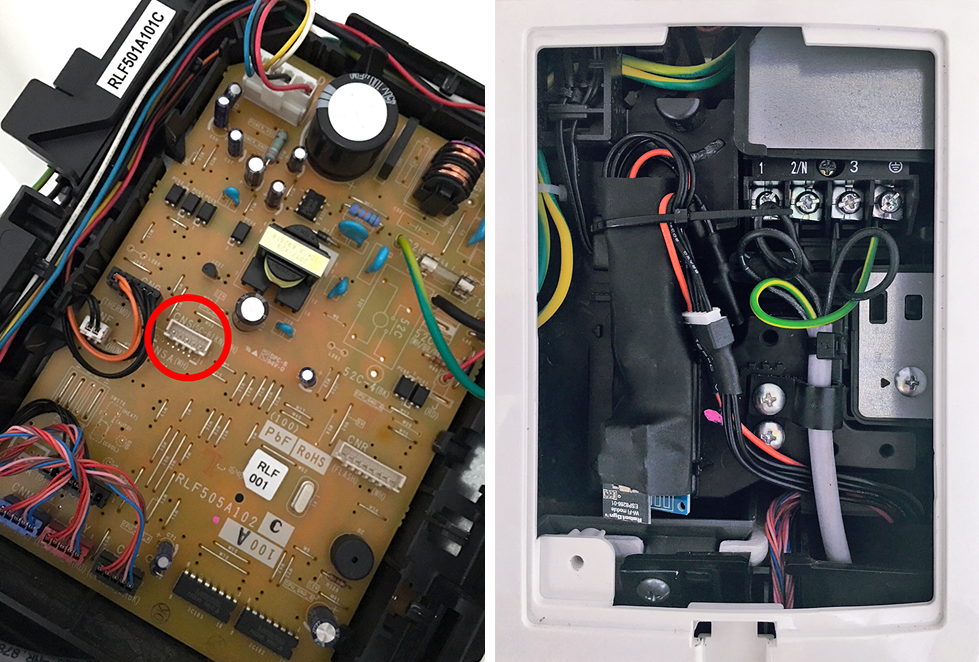
* Google for a service manual of your aircon model for instructions on how to get access to the CNS connector. The image below is of an SRK50ZS-S where I extended the CNS connector from the more difficult-to-reach side panel to the front mains connection box for easy access. Please switch off the mains before doing this and take care that the module is properly isolated (e.g. shrink wrap) and fixed with a cable tie so it can’t touch the high-voltage terminals.
Wireless operation using MQTT
The table below shows the topics and respective value range that can be used to operate the aircon:
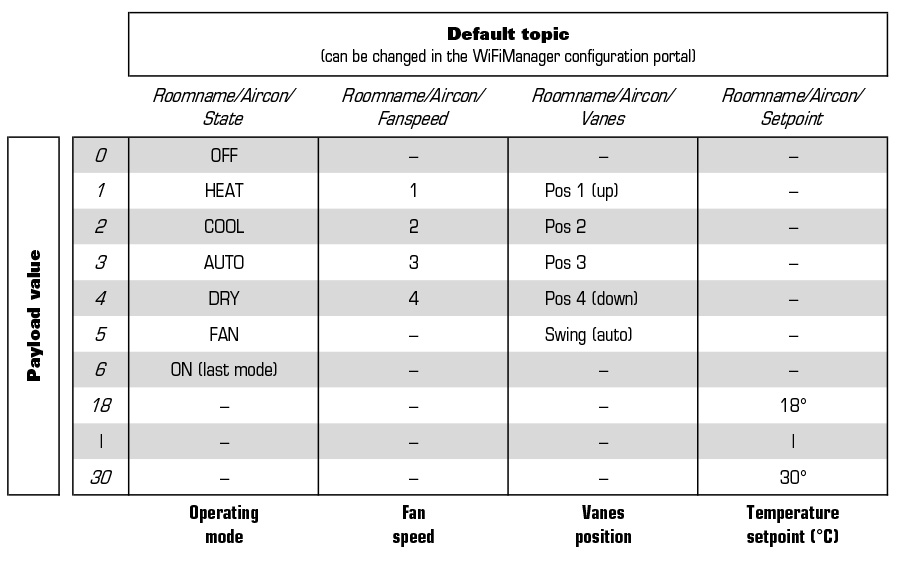
The default topic statusRoomtemp will be updated with the ambient temperature (in degrees Celsius) every ~6 seconds.
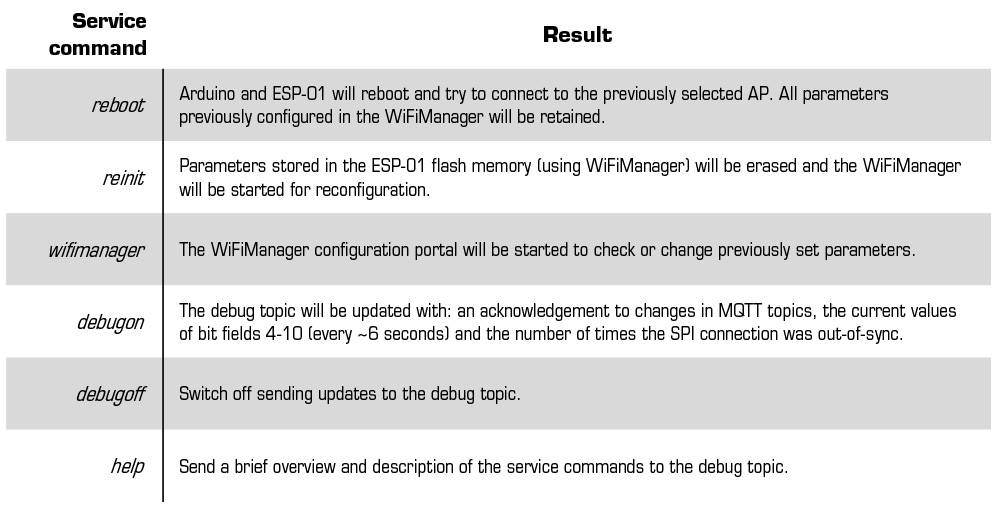
Various service commands can be send to the service topic and the system will respond as follows:
Behavior when the WiFi network or MQTT broker is down
- When the MQTT broker becomes inaccessible, three reconnection attempts will be made by the ESP-01 with ~5 seconds in between. The system will restart if this fails and will first try to reconnect to the access point and then to the MQTT server. This behavior was chosen because if the network client running the MQTT broker disconnects from the access point, the ESP-01 will still be unable to connect to the broker after the client has reconnected. A complete restart of the ESP-01 and reconnection to the access point solves this.
- When the WiFi connection between the ESP-01 and the access point is lost, the system will restart after a while and WiFiManager will try to connect to the previously configured access point. If this still fails, WiFiManager will start in access point mode (SSID default: MHI Roomname) awaiting reconfiguration by connecting to it. After the timeout previously set in the configuration portal has passed (default: 5 minutes), the ESP-01 will restart again and try to reconnect to the previously configured access point. These events will loop endlessly, giving some time to change the configuration when the router SSID, password or MQTT broker host has changed. The ESP-01 should always reconnect after a general power outage, but this might take 5 minutes or more.
Notes
Details about the communication protocol
- Low-level SPI protocol exchanging frames of 20 bytes/bit fields using LSB first, 8 bits/transfer, clock is high when inactive (CPOL=1), data is valid on clock trailing edge (CPHA=1). Timing details of 20-byte SPI frames: 1 byte ~0.5 msec; 20-byte SPIframe ~10 msec; pause between two frames ~30 msec. Time between the start of 2 consecutive frames is ~40 msec (~25 Hz).
- High-level SPI protocol where master (MHI) and slave (Arduino) exchange a repetitive pattern of special bit settings in bit fields 10, 13-16 and 18. In contrast to the low-level SPI protocol, the SPI slave now functions as a ‘master’ and generates what appears to be its own low frequency clock (~0.5 Hz) by toggling bit 3 of bit field 18 every 24 SPI frames. All bidirectional changes in values are synchronous to this ‘clock’, with few exceptions such as the room temperature in bit field 7. To successfully connect, a sequence of 3 repeating SPI frame variants should be send to the MHI. If correct, the MHI will respond by sending its own frame variations to acknowledge a valid SPI connection (?). Possibly, the frame variations send back by the MHI identify the unit type and can be used by the controller to make unit-specific functions available. Each frame variation is send 24 times with bit 3 of bit field 18 set to 1, and subsequently 24 times with bit 3 cleared. The total duration of a complete frame cycle (3 frame variations x 48 times each) is ~6 sec, then the sequence is started all over. All changes in settings should be send synchronously to the byte 18 ‘clock’, starting at the beginning of the first SPI frame that has bit 3 of bit field 18 set to 1, and lasting the full duration of a clock cycle (= 48 SPI frames). In order to change a setting on the MHI, the correct bit fields should be set/cleared AND a function-specific ‘write’ bit should be set to 1 for a full 48-frame cycle in order to have the MHI accept and apply the new setting. For all subsequent frames, only the ‘write’ bit should be set back to 0, while the rest of the newly set bits should be unaltered. If the change is accepted, the MHI will start sending back the newly accepted settings starting from the next full 48-frame cycle.
Notes on handling SPI communication in the code
The Arduino Mini Pro had problems staying in sync with the aircon’s SPI data during the early test phase. To solve this, a state machine type of approach was chosen to prevent the SPI interrupt routine from being obstructed (by e.g. UART serial communication with the ESP-01) until a full 20-byte is received (state 0). Then, two states are possible: one to update frames, calculate checksums and send values obtained from the aircon to the ESP-01 (state 1); and one where the serial connection is checked for data arriving from the ESP-01 (state 2). When debugging is enabled using the service command debugon, the debug topic will provide a cumulative count of the number of SPI synchronisation errors (until a reboot/reset). I never ran into sync issues anymore since I started using the state machine approach, so this debugging feature is obsolete unless you want to test the sketch on other Arduino boards.
Acknowledgments
This work would not have been possible in the current form without the ingenious work of others: WiFiManager by Tzapu, PubSubClient by Nick O’Leary, EasyTransfer by Bill Porter and ArduinoJson by Benoît Blanchon. In addition to using these libraries, parts of the code were obtained from the example sketches.
License
This project is licensed under the terms of the MIT license.